It’s release day, the deploy went green, and twenty minutes later support tickets start piling up. The rollback plan exists, but it lives in one engineer’s head, and that engineer is in a different time zone. Nobody skipped that step on purpose, but it was never written down where the rest of the team would see it.
That gap costs more than a rough afternoon. According to Google Cloud’s 2024 Accelerate State of DevOps report (DORA), elite teams have a change failure rate eight times lower than low performers. Much of that difference comes from repeatable release habits rather than heroics.
A release management checklist turns those habits into a successful product release process your whole team can follow. Below, you’ll get a five-phase product release checklist with copy-ready items, an exit gate for each phase, a free Google Sheets template, and guidance on adapting it for agile and enterprise teams.
If you want the bigger picture of how release management works first, start with our Release Management 101 guide.
Why a release management checklist is essential
A software release rarely fails because a team lacks skill. It fails because a dozen small, known steps depend on someone remembering them under time pressure. A checklist moves that memory out of people’s heads and into a shared, visible process.
Without a checklist, teams tend to face:
Steps that get skipped when the usual owner is out or the release is rushed
A rollback plan nobody has tested until the moment it’s needed
Support, sales, and customer success hearing about a change after customers do
Arguments mid-incident about whether a dip is “bad enough” to roll back
Old feature flags piling up because cleanup was never anyone’s job
With a checklist, teams get:
The same release process every time, no matter who’s running it
A named owner for every item, so nothing falls between teams
Stop and rollback criteria agreed before the release, not during it
Exposure that grows in stages, so problems reach a small group first
A record of what happened, which makes future releases faster to plan
The complete release management checklist (by phase)
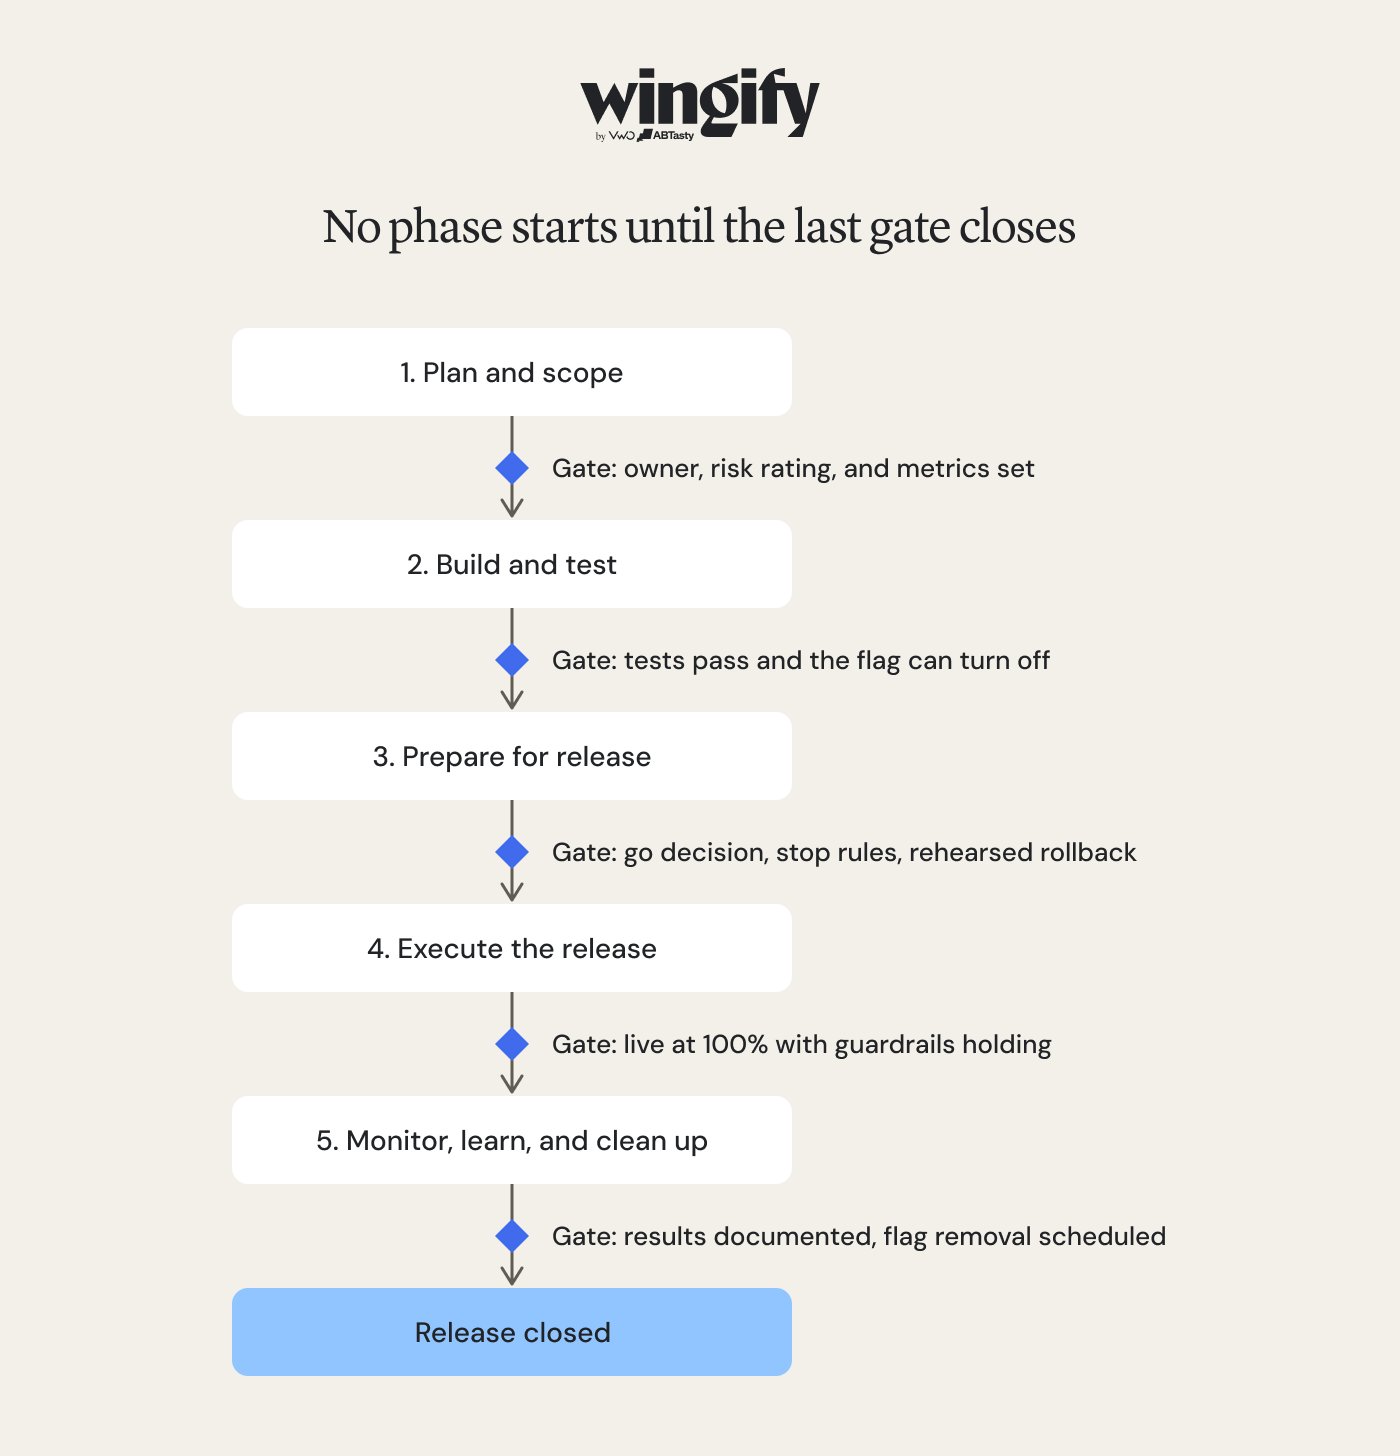
A complete release management checklist covers five phases, from scoping the release to removing the feature flag afterward. Each phase below ends with an exit gate, the condition your team should meet before moving on.
The five phases at a glance:
Plan and scope: decide what’s shipping, who owns it, and what success looks like.
Build and test: build behind feature flags and prove the change works.
Prepare for release: confirm readiness, write your stop rules, and make the go/no-go call.
Execute the release: deploy the code, then expose the feature in stages.
Monitor, learn, and clean up: confirm the impact, run the retro, and remove the flag.
Phase 1: Plan and scope the product release process
Most release problems start here, as a vague scope or an unclear owner. Release planning is where you decide how much risk each change carries and how you’ll release it.
Define release scope by listing every change, linked to its ticket or spec
Name one release owner who makes the final go/no-go call
Assign an owner to every checklist item, including support and marketing tasks
Set success metrics, starting with the primary metric each change is meant to move
Define guardrail metrics that must not get worse, such as error rate, latency, conversion rate, and support ticket volume
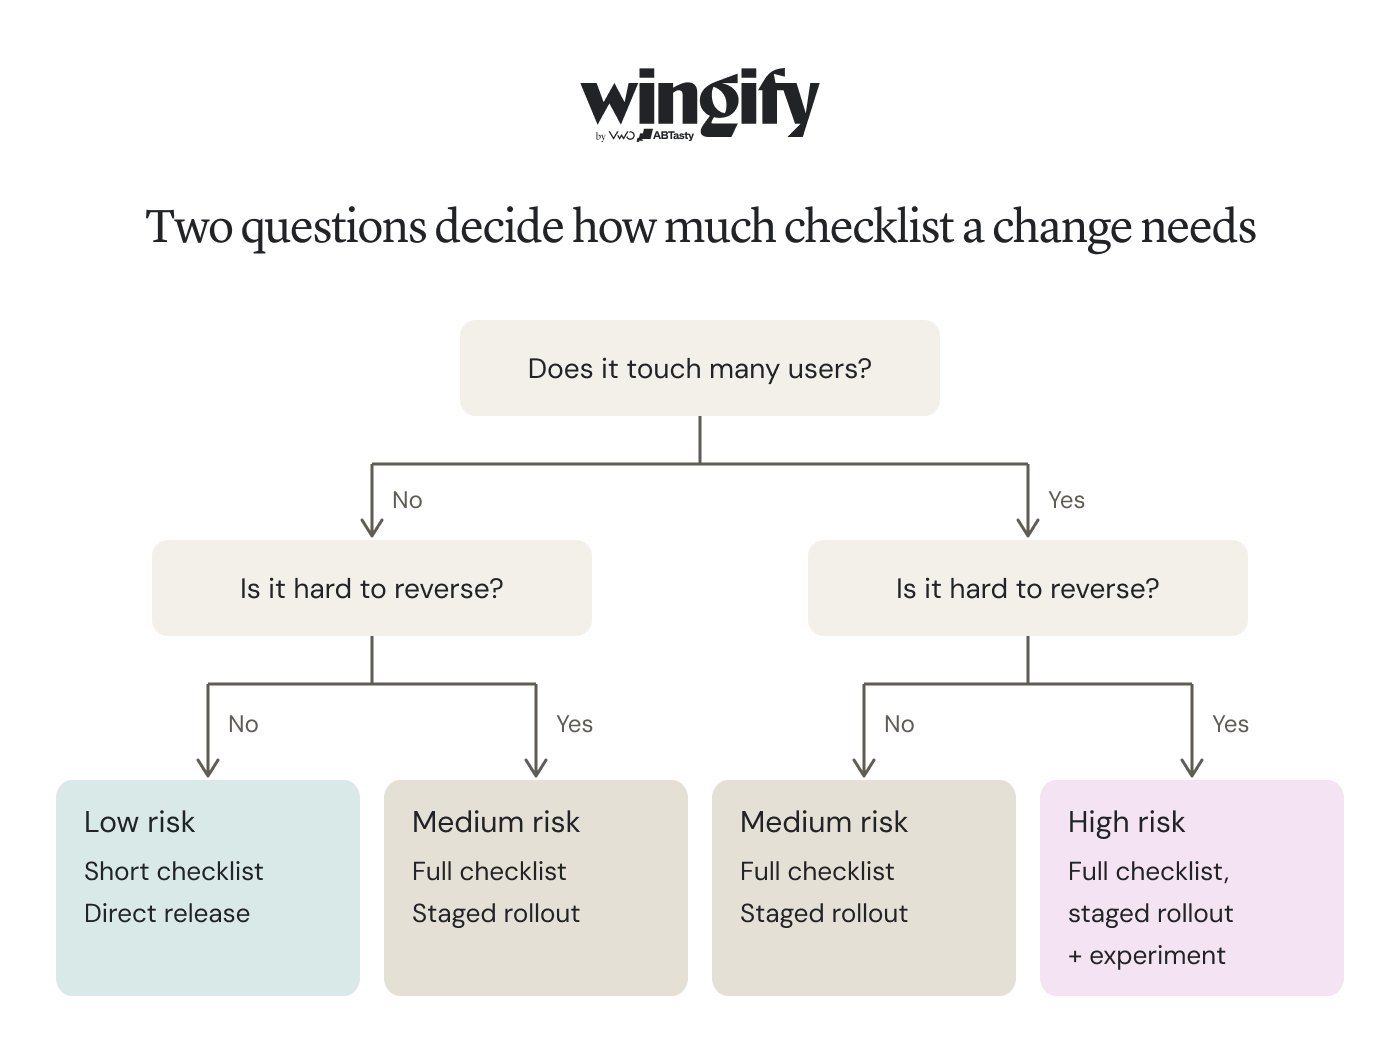
Rate each change as low, medium, or high risk, based on how many users it touches and how hard it is to reverse
Match the release approach to the risk: a direct release for low risk, a staged rollout for medium, and a staged rollout plus an experiment for high
Map dependencies on other teams, services, and third-party vendors
Decide release timing and pick a window that avoids your known traffic peaks
Exit gate: every change has an owner, a risk rating, a success metric, and guardrails.
Gone are the days when product managers could confidently launch a feature and move on without thorough validation. Today, the ability to precisely measure how changes affect key business outcomes is non-negotiable. Product managers who master data literacy to inform, iterate on, and measure impact stand out as excellent, not just good.
This is the quality assurance phase. The goal is a change that works and can be switched off without a redeploy. Building behind flags is what makes the later phases possible.
Wrap every user-facing change in a feature flag that’s off by default
Complete code review for all changes
Run your test plans, including unit, integration, and regression suites, in your CI pipeline
Run performance testing at expected peak load
Run security and dependency scans
Check accessibility on any new UI
Confirm that events behind your primary and guardrail metrics fire correctly in staging
Test the feature with the flag on and with it off, and confirm the off path still works
Verify that staging configuration matches production
Exit gate: all tests pass, metrics are firing, and the feature can be turned off without a code change.
Phase 3: Prepare for release
Release preparation is the phase teams most often rush, and it’s where you make the decisions you don’t want to make mid-incident. Write down what “bad” looks like now, while everyone is calm.
Write internal and customer-facing release notes
Brief customer-facing teams, such as support, sales, and customer success, with FAQs and known limitations
Write stop rules for each guardrail. For example, pause if the error rate stays 2% above baseline for 10 minutes, and roll back if checkout conversion drops 5% or more
Configure the kill switch and confirm who’s allowed to trigger it
Rehearse the rollback in staging and note how long it takes
Confirm on-call coverage from your operations teams for the release window and the 48 hours after
Complete your monitoring setup, with one dashboard that shows primary and guardrail metrics side by side
Collect user acceptance testing sign-off and any other approvals your process requires
Hold a short go/no-go meeting where the release owner makes the call
Exit gate: a recorded go decision, written stop rules, and a rehearsed rollback.
Pro Tip!
Run a dry run in the feature debugger in Wingify Feature Management before your go/no-go meeting. It tests your feature flags and evaluates your rules before full deployment, so a targeting mistake shows up in a rehearsal instead of in front of customers.
Phase 4: Execute the release
In this phase, deployment execution and feature release happen as two separate steps. The code goes to production with the flag off, and exposure grows only as the data allows.
Check the health of your production environment and confirm there are no active incidents
Deploy the code with the feature flag off
Turn the feature on for internal users and test critical user paths
Release to a small first cohort, for example 1 to 5% of users
Hold each stage long enough to see real traffic, then check results against your stop rules
Expand in planned steps, such as 5%, 25%, 50%, and 100%, with a check at each one
Watch support channels alongside your dashboards
Post a status update in the release channel at every stage
Pause or roll back the moment a stop rule triggers, then investigate
Exit gate: the feature is live for 100% of its target audience, with guardrails holding for the agreed period.
Meliá followed this pattern when it added a new step to its booking journey to surface extra services. The team started at 5% of users and validated the change with guardrail metrics, then scaled to 100% within a week with no increase in drop-offs. The new step delivered a 1.85% uplift in average revenue per visitor. For a more in-depth understanding of the topic, read our progressive rollouts guide.
Pro Tip!
Add your rollout rule before any testing or personalization rule on the same flag. In Wingify Feature Management, a user must qualify for the rollout rule before they can enter an A/B test or personalization on that flag, so your rollout percentage acts as a ceiling on everything else you run.
Phase 5: Monitor, learn, and clean up
Reaching 100% doesn’t make it a successful release. Post-release monitoring confirms the change did what you planned, and cleanup stops leftover flags from turning into tech debt.
Monitor primary and guardrail metrics for at least one full business cycle, often a week
Compare results with the success criteria you set in phase 1
Review support tickets and user feedback for recurring themes
Watch session recordings or check funnels wherever metrics moved unexpectedly
Update documentation, runbooks, and the release tracker
Hold a 30-minute retrospective on what slowed you down and what nearly went wrong
Update this checklist with anything you learned
Set a removal date and an owner for every release flag
Remove the flag and its dead code once the feature is stable
Exit gate: results are documented, the checklist is updated, and flag removal is on the calendar.
Release management checklist template (copy and customize)
All 45 items in this release checklist template come prefilled with a suggested owner, due date, and blocking flag, so you only adjust them to fit your team.
Make a copy and fill in your release name, release owner, release day, and risk level in the yellow cells.
Replace the suggested owner roles with named people.
Delete the items that don’t apply and add your own, such as compliance reviews.
Check the blocking flags and change any that don’t fit your process.
Start a fresh copy for each release and keep past copies as your release history.
Each item in the template has:
Owner: a suggested role that you replace with one named person
Due: timing relative to release day, such as R-2 (two days before) or R+7 (a week after). Enter your release day once and the sheet turns every item into a real date
Blocking: whether the release can move to the next phase before the item is done
Status: not started, in progress, done, or skipped
Evidence and notes: a link that proves the item is done, plus context for the next release
A summary at the top shows how many items are done, how many are overdue, and how many blocking items are still open in each phase. That last count is your go/no-go check.
To get started:
Make a copy and fill in your release name, release owner, release day, and risk level in the yellow cells.
Replace the suggested owner roles with named people.
Delete the items that don’t apply and add your own, such as compliance reviews.
Check the blocking flags and change any that don’t fit your process.
Start a fresh copy for each release and keep past copies as your release history.
How to build and customize your release management checklist
A borrowed checklist is a starting point. The version that protects your releases is the one shaped by your own near misses, your stack, and your team’s roles. Here’s how to get there.
1. Start from your last few releases. Pull up the last three releases or incidents and list everything that went wrong or almost did. Each of those becomes a checklist item, which gives the checklist credibility with the people who lived through them.
2. Write every item as a verifiable action. “Rollback ready” can’t be checked. “Rehearse the rollback in staging and record how long it takes” can, and it leaves evidence behind.
3. Give each item one owner. Assign by role in the template, then by name for each release. An item owned by the “development team” is an item nobody owns.
4. Scale the checklist to the risk. A copy change doesn’t need the same process as a new pricing engine. Define a short list for low-risk changes and reserve the full checklist for high-risk ones, using the risk rating from phase 1.
5. Agree on stop rules with the people on call. The people who’ll be watching dashboards at the release should help set the thresholds. Rules they helped write are rules they’ll act on without hesitating.
6. Let your release platform enforce what it can. Every item a platform can handle is one less item that depends on someone remembering it, and this is where a feature management platform earns its place.
With Wingify Feature Management, product managers can take greater ownership of how features are tested, targeted, and released. Feature Experimentation helps them validate feature changes through controlled experiments, while Feature Rollout lets them manage exposure across user cohorts and adjust rollout thresholds as release conditions change. With Feature Personalization, they can tailor feature experiences to specific customer segments using audience targeting rules. Together, these capabilities allow product teams to respond to performance signals and make informed release decisions without requiring engineering intervention for every configuration change, while engineering retains control over the underlying code and infrastructure.
Aurum demonstrates how this flexibility supports complex product changes across the user journey. The legal technology company used Wingify Feature Experimentation to test improvements to its trial onboarding, from redesigning the first-time user experience and introducing guided onboarding checklists to integrating an external API that made legal clippings available immediately. The team used A/B testing for experience changes and controlled rollouts for more complex frontend and backend integrations, monitoring activation, engagement, and guardrail metrics along the way. The result was 4× trial activation.
7. Review the checklist after every retrospective. Add what the release taught you and remove items that never catch anything. A checklist that only grows eventually gets ignored.
Adapting the checklist: agile and enterprise releases
The core difference is frequency versus coordination. An agile release management checklist has to be light enough to run every sprint without slowing delivery, while an enterprise release management checklist has to hold many teams, approvals, and audit requirements together for a single release. The five phases stay the same in both, but the amount of work inside each one changes.
Agile teams
Enterprise teams
Release rhythm
Every sprint or continuously
Scheduled release trains or windows
Main risk
Skipped steps under speed
Missed handoffs between teams
Checklist goal
Fast and repeatable
Governed and auditable
What to cut
Formal meetings and long sign-offs
Duplicate approvals across teams
Agile release management checklist
With a short release cycle, agile teams can’t afford heavy ceremony, so the checklist should live inside the workflow they already use. Add these items to the base checklist:
Include “flag created, metric defined, owner assigned” in your definition of done for every story
Run phase 2 checks automatically in CI, so the checklist only tracks exceptions
Replace the go/no-go meeting with a short async sign-off in the release channel
Keep a standing set of stop rules for the product, then adjust them only for unusual changes
Add flag cleanup tickets to the backlog as soon as a feature reaches 100%
Review the checklist in sprint retrospectives rather than in a separate meeting
Enterprise release management checklist
Enterprise releases involve more people and more consequences, so the additions focus on coordination and traceability. Add these items to the base checklist:
Map every team, service, and region the release touches, with a named contact for each
Document change approvals and keep the evidence for audits
Define who can change flags in each environment and require approval for production changes
Schedule releases around regional peaks, regulated periods, and code freezes
Coordinate customer communications by segment or account tier
Prepare a staged rollout by region or customer group, not only by percentage
Hold a cross-team readiness review so every team is on the same page before the go/no-go decision
Track flag ownership across teams so nothing outlives the people who created it
Turn your release management checklist into a team habit
A release management checklist is really an agreement your team makes ahead of time about what “ready” means, what “bad” looks like, and who acts when it happens. Teams that write it down stop relying on whoever happens to be online, and every release makes the next one a little easier to plan.
The more of that agreement your release platform can enforce, through staged exposure, guardrail metrics, and kill switches, the less of it rests on memory at 5 p.m. on release day. If you’d like to see how Wingify Feature Management builds those controls into each phase of your checklist, request a demo.
FAQs
What’s the difference between a release management checklist and a deployment checklist?
A deployment checklist covers getting code into production safely, such as builds, database migrations, configuration, and health checks. A release management checklist covers the whole process around that, from scoping and stakeholder communication to staged exposure, impact measurement, and flag cleanup. In practice, the deployment checklist sits inside phase 4 of the release checklist.
How often should you update your release management checklist?
Make small updates after every release retrospective, adding what the release taught you and removing items that never catch anything. Then do a fuller review each quarter, or whenever your team structure, tech stack, or compliance requirements change.
Can you use a release management checklist with CI/CD?
Yes, and the two work best together. CI/CD automates building, testing, and deploying code, so those checks can move into your pipeline while the checklist simply tracks their results. The checklist then covers what pipelines can’t, such as ownership, communication, stop rules, the go/no-go decision, and cleanup. Feature flags let you deploy continuously while still releasing features in controlled stages.
What tools help you manage a release management checklist?
Most teams combine a shared spreadsheet or project tracker for items and owners, a CI/CD platform for automated checks, and a monitoring dashboard for metrics. A feature management platform such as Wingify Feature Management handles the rollout items, including progressive rollouts, guardrail metrics, and kill switches. A team chat channel works well for stage-by-stage status updates.
Hi, I’m Pratyusha Guha, manager - content marketing at VWO. For the past 6 years, I’ve written B2B content for various brands, but my journey into the world of experimentation began with writing about eCommerce optimization. Since then, I’ve dived deep into A/B testing and conversion rate optimization, translating complex concepts into content that’s clear, actionable, and human. At VWO, I now write extensively about building a culture of experimentation, using data to drive UX decisions, and optimizing digital experiences across industries like SaaS, travel, and e-learning.
You might also love to read these on Your Guide to Feature Flags
15+ Min Read
Best Tools for Scaling A/B Testing in 2027
15+ Min Read
Rolling Deployment Explained: How Batch-by-Batch Releases Work